
Overview
The RESTTable component allows an Articles report to pull live data directly from QuickBooks Online (QBO) and use it as a data source inside the report designer. Once connected, your report will fetch fresh data from QuickBooks every time it runs — no exports, no CSV files, no manual steps.
This guide walks you through everything you need to get a QuickBooks Online connection working in Articles, from setting up your app in the Intuit Developer Portal to running your first report.
Before You Start
To connect Articles to QuickBooks Online you need a free Intuit Developer account and a registered app. This is how Intuit controls which applications are allowed to access QuickBooks data.
- Go to https://developer.intuit.com and sign in or create a free account.
- Click Create an App and choose QuickBooks Online and Payments.
- Give your app a name — this is only visible to you.
- Under Scopes, select Accounting.
- Once the app is created, go to Keys & OAuth. You will see a Client ID and Client Secret — copy both, you will need them shortly.
- Under Redirect URIs, add exactly:
http://localhost:9876/callback
Keep the Intuit Developer Portal open — you will need your Client ID and Client Secret in the next step.
Finding Your QuickBooks Company ID
Every QuickBooks Online company has a unique Company ID that appears in the API URL. You need this to build your report URL.
- Log in to QuickBooks Online at qbo.intuit.com.
- Look at the URL in your browser address bar. It will look something like this:
https://qbo.intuit.com/app/homepage?realmId=123456789012345
The number after realmId= is your Company ID. Copy it — you will use it in the URL property below.
Adding RESTTable to Your Report
- Open your report in the Articles designer.
- In the component toolbar, locate RESTTable and drop it onto the report.
- The component will appear in the designer. Click it to select it and open the Object Inspector on the right.
Setting the Properties
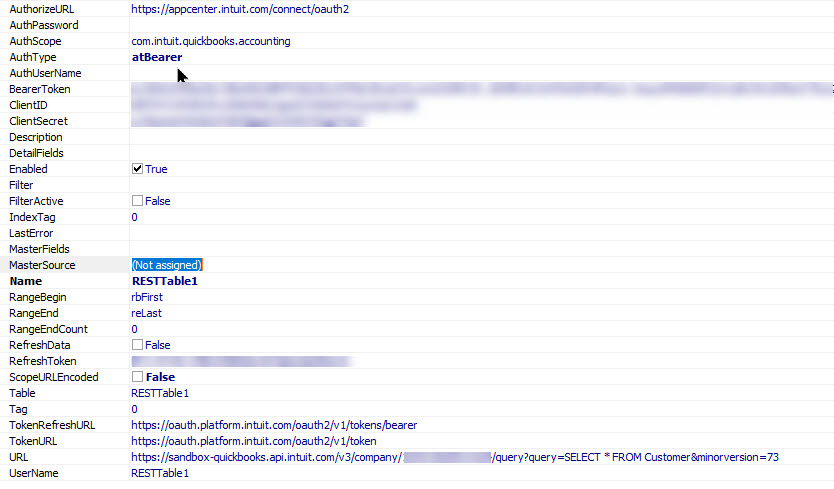
With the RESTTable selected, set the following properties in the Object Inspector exactly as shown.
AuthType
Set to atBearer. This tells Articles to send the QuickBooks access token with every request.
ClientID
Paste your Client ID from the Intuit Developer Portal.
ClientSecret
Paste your Client Secret from the Intuit Developer Portal. Articles encrypts this automatically — it is never stored as plain text.
AuthorizeURL
Set to exactly:
https://appcenter.intuit.com/connect/oauth2
TokenRefreshURL
Set to exactly:
https://oauth.platform.intuit.com/oauth2/v1/tokens/bearer
TokenURL
Set to exactly:
https://oauth.platform.intuit.com/oauth2/v1/token
AuthScope
Set to exactly:
com.intuit.quickbooks.accounting
ScopeURLEncoded
Set to False. QuickBooks requires the scope to be sent as plain text — this setting ensures Articles does not encode it.
URL
This is the QuickBooks API endpoint Articles will call to fetch your data. Replace YOUR_COMPANY_ID with the Company ID you found earlier.
For example, to fetch all customers:
https://quickbooks.api.intuit.com/v3/company/YOUR_COMPANY_ID/query?query=SELECT * FROM Customer&minorversion=73
For the QuickBooks sandbox (for testing):
https://sandbox-quickbooks.api.intuit.com/v3/company/YOUR_COMPANY_ID/query?query=SELECT * FROM Customer&minorversion=73
Change SELECT * FROM Customer to any valid QuickBooks query. See the QuickBooks API reference for available entities.
Authorizing with QuickBooks
Once all properties are set you need to authorize Articles to access your QuickBooks company. This only needs to be done once — Articles stores the connection securely and refreshes it automatically from then on.
- In the Object Inspector, find the AuthorizeURL property.
- Click the [...] button next to it.
- Your default web browser will open and take you to the QuickBooks sign-in page.
- Sign in with your QuickBooks Online account.
- Select the company you want to connect to and click Connect.
- The browser will show Authorization Successful — you can close that tab.
- Back in Articles, a message will confirm the connection is ready.
If the browser does not open automatically, make sure port 9876 is not blocked by a firewall on your computer.
Testing the Connection
After authorizing, test that data loads correctly before building your report layout.
- In the Object Inspector, find the RefreshData property.
- Set it to True and press Enter.
- Articles will call the QuickBooks API and report how many records and fields were returned.
- If it succeeds, the fields from QuickBooks will appear in the Data Tree on the left — ready to drag onto your report bands.
If it fails, check the LastError property — click the [...] button next to it to see the full error message.
Common Errors
Token exchange failed — The Client ID, Client Secret, or TokenURL is incorrect. Double-check all three against your app in the Intuit Developer Portal.
HTTP 401 Unauthorized — The connection has expired or the wrong company is connected. Click [...] next to AuthorizeURL to re-authorize.
HTTP 400 Bad Request — The URL or query is malformed. Check that your Company ID is correct and the SQL query is valid QuickBooks syntax.
Could not start OAuth listener on port 9876 — Another application is using port 9876. Close other applications and try again, or restart your computer.
Authorization timed out — The browser took too long. Click [...] next to AuthorizeURL to try again.
How Token Refresh Works
QuickBooks access tokens expire after one hour. Articles handles this automatically — when a token expires mid-report, Articles silently requests a new one using the stored refresh token and continues without any interruption. You do not need to re-authorize every hour.
The refresh token itself lasts 100 days. If it expires — for example if the report has not been run for an extended period — Articles will prompt you to re-authorize by clicking [...] next to AuthorizeURL again.
Sandbox vs Live
Intuit provides a sandbox environment for testing that uses separate data from your real QuickBooks company. Use the sandbox URL while building and testing your report, then switch to the live URL when you are ready.
Sandbox URL:
https://sandbox-quickbooks.api.intuit.com/v3/company/YOUR_COMPANY_ID/query?query=SELECT * FROM Customer&minorversion=73
Live URL:
https://quickbooks.api.intuit.com/v3/company/YOUR_COMPANY_ID/query?query=SELECT * FROM Customer&minorversion=73
The sandbox and live environments each have their own Company ID and require separate authorization.
Notes and Limitations
Articles expects the QuickBooks API to return a JSON array of records. The RESTTable component automatically unwraps the QuickBooks response format — you do not need to do anything special to handle it.
All data is loaded into memory when the report starts. For large datasets, add a WHERE clause to your query to limit the number of records returned — for example SELECT * FROM Customer WHERE Active = true.
QuickBooks API queries use a SQL-like syntax called QuickBooks Query Language. See the QuickBooks query documentation for full details on filtering, sorting, and pagination.